Sitecore – Segments and Segmented List

In my last article, while concluding I mentioned that we can create lists for male 18-30; 30-40 and 40 & above, use them relevant campaigns. This is the follow up or a sequel kind of article discussing about that use case. I thought just like how we created a logic that checks the contacts gender and adds them to a list, similarly we can retrieve a contacts DOB, calculate their age and add them to the list. (Spoiler – that’s not how we are going to add them to a list in this article)

After I shared that article for comments, I was pointed out that, unlike gender which is a constant throughout the customer engagement, age is not a constant. In varies daily, in fact increases daily. So, we have to run this logic regularly to update the list. Which is probably not a good idea and I was directed to segments and hence this article.

Segments Vs List

Unlike lists, when we create a segmented list, we can specify ‘Segments’ for that list. Now, List Segment or Segments are just rules. When we specify the ‘Segment’ for a list, only the contacts that satisfy these rules will be added to that list. It means that, when you create a normal Contact List, you can add contacts from sources (Sources can be any other lists or you can add contacts to that list via code or you can add contacts manually or via Marketing Automation etc) but, in segmented list you can specify a rule like ‘when contact gender is male’ or ‘when contact is from a specific city/country’ and sitecore does the remaining part. It will add only the contacts that matches these rules. In a way, lists are static whereas segmented lists are dynamic. When you create a segmented list, the segments mapped to that list are run and then the contacts are added. When you make a change to the rules – segments – the list is updated based on the new conditions.

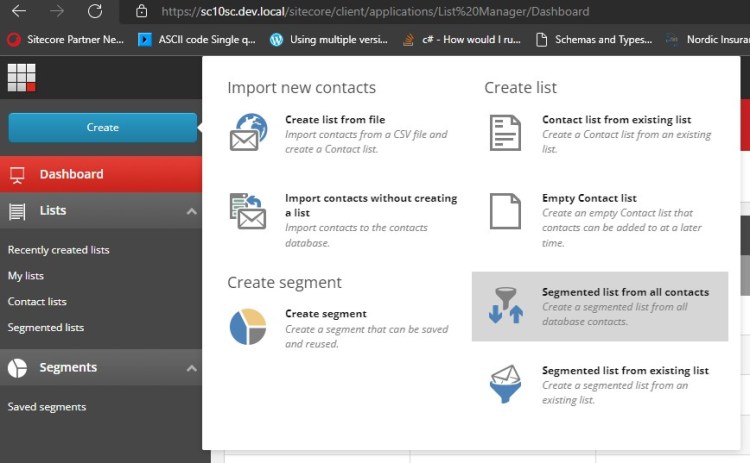
Enough with the theoretical part, let’s pick a business case and create a segmented list. Let me pick the age based business case itself but with a small change. Instead of seeing it from age perspective, let us create a segmented list base on the date of birth like people born between 1990 to 1995 to explain about segmented list.

Sitecore provides few OOTB rules which we can use to create segments. But this Date of Birth between Min Date and Max Date although is available but wont be visible in the available rules list as it deals with PII Sensitive Data.

(We can create new rule based on the relevant template and configure the values like I mentioned in one of my prev. article, but this rule item has everything we need so in order to save some time I am making use of this rule item and will make necessary changes to suit our requirement)

In order to use this rule,

  • These rules are grouped under, /sitecore/system/Settings/Rules/Definitions/Elements/XConnect – Contact Personal Details Conditions,

  • Create a copy of the Where Contact Birth Date Between item under /sitecore/system/Settings/Rules/Definitions/Elements/XConnect – Contact.
  • Alright in the screenshot, if you notice the type field value in the script section you might see the custom rule mapped.

This is because, sitecore rules is of three types, the one we use in personalization of a page, the next one which is used in Marketing Automation and the final one is the one which we use in Segmented Lists. Although the may seem similar, these rules are quite different from the code perspective. For the segmented lists, these rules must be inherited from IContactSearchQueryFactory and should implement CreateContactSearchQuery() method. This method will be used during the process of adding contacts to the segmented list by sitecore.

Having said that the actual item’s type value doesn’t inherit IContactSearchQueryFactory. PFB screenshot. So, if we use this rule as it is, we will get error.

So, we will create a custom rule class based on this one and make sure that it inherits IContactSearchQueryFactory and write our logic in CreateContactSearchQuery.

The Logic is simple, CreateContactSearchQuery needs to return a lambda expression, so from the contact, we can create an expression, that gets the personal info and uses the date of birth and tests if it passes our conditions.

Okay so you may think now, we can use this rule and create a segment and then a segmented list right? Even I thought so. But, although I didn’t get any error while using this rule, this list was not getting populated with contacts.

After several code changes, trial and errors, I came across an article mentioning that Sitecore Xdb core by default doesn’t index PII sensitive data by default.

Now it made sense, in order for use to use a PII Sensitive field like DOB, we need to set this IndexPIISensitiveData to true and rebuild xDb index.

  • We need to make this change in {xconnect}\App_Data\jobs\continuous\IndexWorker\App_Data\config\sitecore\SearchIndexer\sc.Xdb.Collection.IndexerSettings.xml
  • Now, we have to reindex xDb Core. To do this, open CMD and go to {xconnectwebroot}\App_Data\jobs\continuous\IndexWorker and run ‘Sitecore.XconnectSearchIndexer.exe -rr’

Now we have everything in place, we have the date of birth related segmented rule, lets a create a segmented list for all contacts who are male and born between 1990 to 1995.

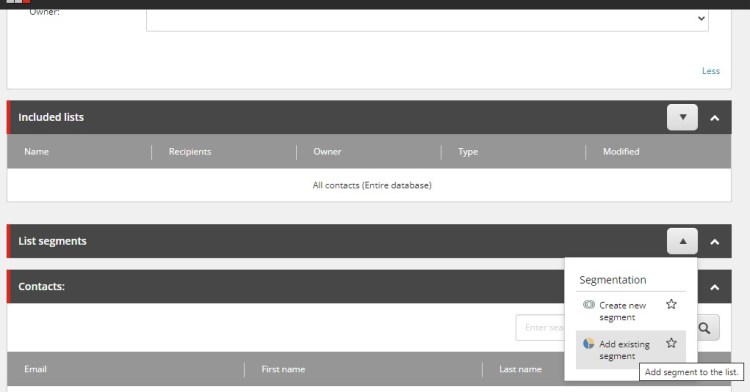
After clicking Save, the list will be populated with the contacts matching the segment rule – gender male and DOB between 01/01/1990 and 01/01/1995

P.S:

  • This still doesn’t solve ‘the age of the contact gets updated everyday and the list wont be updated everyday problem.’
  • But, using this segmented list, before starting any campaign or any marketing automation, we can generate a list based on their date of birth range and use them for that campaign.

Sitecore – Custom Submit Action – Create Contact – List Management

We have explored creating a Custom Form Element – Rich Text Field and Creating a Custom Form Field Validator earlier. Ever since I wrote those articles, I always wanted to explore creating a Custom Submit Action. But rather than just writing about  how to implement a custom submit action, I thought I will pick some meaningful business case that demands a custom submit action and explore it from a marketing perspective.

Finally, after several months, when I was having a discussion with one of my ex-colleague I came across this business case. I thought, I will explore it and share my experience here.

So…let’s get started.

We will create a custom submit action, that creates a contact and  we’ll add the contact to different Sitecore Lists based on their gender. Once this list is populated with corresponding contacts, we can use those list for campaigns using E-Mail Experience Manager or Marketing Automation.

So it’s pretty much straight forward now, in this article, we’ll be

Creating a Simple Form that uses a-> Custom Submit Action, to -> Create Contact based on that user info submitted -> Add the contact to Male Contact List or Female contact List based on the gender value they have specified in the form.

We will be using a simple Sitecore Form, no complex fields. In fact, I created one registration form long back. I will use that for our case.

However, we’ll be using our newly created Custom Submit Action – Create Contact.

Creating a Custom Submit Action:

  • To create a custom submit, create a class that inherits from SubmitActionBase<string>. This SubmitActionBase is available in Sitecore.ExperienceForms assembly.
  • This SubmitActionBase has a Execute method which we will be overriding and writing our custom logic there.
  • This execute method has Sitecore FormSubmitContext as one of the arguments. This FormSubmitContext had fields that provide details about the Submitted Form like the field values, if it has any errors, page in which the form is submitted from etc.
  • We will be reading the values of the form fields submitted by the user. And assign it to a custom user model.
  • Based on the field type the way in which we read the field value differs. In our case, we had a radio button/date and a DropDownList.
  • Once the User object is assigned values, we will pass that to CreateContactandSubscribetoList Helper method that creates contact based on it.
    • Creating a contact is simple, instantiate an Xconnect Client, create a contact object, set the required facets i.e., Personal Facets, E-Mail/PhoneNumberList facet in our case.
  • Creating a Sitecore Submit Action Item.
    • Under /sitecore/system/Settings/Forms/Submit Actions, create a new Submit Action named CreateContact based on Submit Action template(Available in the Insert Options)
    • In Settings session, Model Type add the class name along with the full namespace.
  • This custom submit action created will be added to the list of available submit actions in the Forms Editor and we can assign it to our submit button.

Create two Lists:

  • By open List Manager from Launchpad, click Create Empty Contact List. Create two such lists, one for Male and one for Female.
  • Make a note the IDs of these two lists. We need the List ID to subscribe a contact to that list.
  • The IDs of these two list can be obtained from Marketing Control Panel. -> /sitecore/system/Marketing Control Panel/Contact Lists/

Add Contact to the List based on the gender:

  1. To add a contact to a list programmatically, we can use ISubscriptionService available in the List Manager API -> Sitecore.ListManagement.Xconnect.Web assembly.
  2. We can add the contact to the list using the Contact ID and List ID.
  3. Add this logic to CreateContactandSubscribetoList helper class.
  4. In a real time scenario, instead of hard coding the list values, we can fetch them from configs or constants.

So, now we have everything in place, let us submit a form and see based on the gender, the contact gets added to the corresponding list.

There we go, the contact got added to the male list. Similarly, the contact’s session details will also be present in Experience Profile as well as we have included the relevant code.

This is sample use case. As you can see, we are obtaining the DOB as well. Similarly, we can create a list of male/female contacts between 18-30; 30-40 and 40 & above. We can create list based on the country if we collect address. And many more such scenarios. This way we can conduct campaigns that are more relevant to the contacts belonging to this list.  Will write an article on how we can setup some campaigns based on these lists in the coming days.

The article related to this business case can be found here.

Sitecore CLI – Non Interactive Client Login – Error while getting client credentials token: invalid_client

Normally, from developer machine, if we want to use, Sitecore CLI for serialization, we would have used the commands,

dotnet sitecore login –auth “IdentityServerURL” –cm  “CMS URL” –allow-write true

which would open the browser and redirect you to Identity Server Login page for Authentication, Once you enter the User Name/Password your session will be authenticated and you would be able to perform the serialization.

If you were to setup a pipeline that does this serialization, using the same approach is not quite possible. Because, everything needs to be automated to the maximum. In order to tackle such cases, Sitecore provides a Non-Interactive way to login->get authenticated and use that authentication/authorization for further serialization process. The command for sitecore non interactive login is,

dotnet sitecore login –authority “IdentityServerURL” –cm “CMS URL” –allow-write true –client-credentials true –client-id “Client ID” –client-secret “Client Secret”

It uses two new attributes – Client ID/Client Secret.

The Official Sitecore documentation, provides all the setup details. It is clear and almost has all the required details. But however, in spite following this article, I came across a couple of issues. Thought I will share about those issues and how we can overcome them here, hoping it helps the community.

Client ID/Client Secret:

  • According to the sitecore documentation, in Sitecore.IdentityServer.DevEx.xml, we should be specifying the client secret/Client ID.
    • This Client Secret/Client ID is based on ‘IdentityServer4.Configuration.IdentityServerOptions.InputLengthRestrictions‘ property, which doesn’t have any minimum length restrictions but the maximum length for these attributes is set to 100.
  • So, if your client secret or client id is string of length more than 100 you might get the below error.

App Pool Recycle – Not Just restarting the web app

  • According to the sitecore documentation, after the changes are done in both these config files, we have to restart these two applications.(CM/Identity Server Web Apps)
  • But merely, restarting the app didn’t workout for me. I was still facing the “Error while getting client credentials token: invalid_client”
    • I tried to replicate this issue in a plain vanilla instance and fortunately I was able to replicate this issue in plain vanilla as well. Reached out to Sitecore and mentioned about this issue to them. They recommended to recycle the app pool as well.
    • So, after making the necessary config changes, it is recommended to recycle the app pool for these two instances as well. Esp. identity server role.
    • After recycling the app pool, after making a config change, this issue is resolved.

This kinda made me, go through the basics once again. What does restart a web app in IIS do and what an app pool recycle do. Sharing that info below.

App Pool Recycle:

When you recycle an application pool, IIS will create a new process (keeping the old one) to serve requests. Then it tries to move all requests on the new process. After a timeout the old process will be killed automatically. You usually recycle your application pool to get rid of leaked memory

I guess this makes sense as to why the issue I faced with the login was fixed after app pool recycle.

App Restart:

"As for restarting a website, it just stops and restarts serving requests for that particular website."

Also, makes sense.

Sitecore – Yesterday…Today and Tomorrow

Sitecore from the year it was founded to this day,(From being a Web Content Management System to a Digital Experience Platform) has made several changes to their products, product features and product portfolio.

The Idea of Sitecore:

Sitecore  was initially created as a project to automate website creation process (after implementing several websites for clients they wanted to automate it) later, the key people around the project at that time, realized the project has a larger scope and has bigger business potential, a market need for such an exclusive product and decided to tap on that opportunity to create a full fledge CMS Product – Sitecore. From that happening around 1998-2001 to today (2021/2022) – Sitecore gearing up to be a Cloud First –  Composable – SaaS offering ,the product and the company has gone through a lot of changes.

If you are new to the Sitecore world, then I would say it’s a good time to get started. Sitecore has released several new products in a very short span – in the last 14-16 months. Thanks to their acquisition strategy. The point is, although the business or functional use of these products are similar to their previous products, these products are new and are getting changed or planned to be altered to fit in the sitecore landscape. This means, these are new products with lots of scope but relatively less players in the market who are well-versed in these products.

I’ve been associated with sitecore development for more than half a decade now and I have watched them update their product/offerings year by year based on market trends, in-dept proprietary studies.

In this article I wanted to share about, where Sitecore wants to position itself in the upcoming years (or at least, my understanding of where sitecore wants to…. ). But, in order to understand that we have to first know where Sitecore was and where Sitecore is now .

So, Let’s get started.

Sitecore Yesterday (Sitecore 6.5 to Sitecore 8) (Content -> Marketing)

I don’t want to start from very early version of Sitecore and bore you. Also, I don’t have much info, related to those early versions of sitecore. Sitecore 6.5 was released around 2011. It was an important release as they made some key upgrades to their Digital Marketing System (DMS) module.

Prior to this phase, Sitecore was much of a web content management system. Of course they were leaders in this segment but still the industry started shifting. This was around 2006 – 2009. With evolution of social media and a shift in Digital Marketing domain, Digital Marketing Modules were the new cool tool to have. But the existing marketing tools which were available in the market had to be integrated with their web application or their CMS. That’s when Sitecore planned to create a unified solution that provides marketing and analytics related module for  your websites in single place – the base for Digital Experience Platform.

“Usually when an organization want to expand they start to acquire other companies. But sitecore wasn’t loaded much to make those acquisitions. So they had to work on these modules from scratch.”

In Sitecore 6.x versions esp. 6.5 and 6.6 introduced key features like Marketing and Engagement Automation, Dashboards and Reports, Real time personalization etc. (2008-2012)*

In Sitecore 7.x versions sitecore made key upgrades to analytics and experience related components. In 7.5 sitecore introduced Profile and xDB. Sitecore introduced Contact entities in these versions. Sitecore Contacts allows use to track users and their behaviors during their visits. (2013-2014)*

Customer Engagement Platform was renamed to Sitecore Experience Platform (XP) which is what it is referred to by today, in this period. Along with this change, several other modules were renamed to what we know them by today.

Experience Analytics, Email Experience Manager etc.

Sitecore 8.x brought in a huge set of upgrades to the product. The look and feel was completely redone. The login screen, the Experience Profile and Experience Analytics. The Launchpad Page was brought in this version. Shared/Final Layout; List Manager and segmentation lists; Path Analyzer; Federated Experience Manager; Experience Optimization, tag contents by Profile cards and etc.

Sitecore introduced Experience Accelerator during this period. Sitecore 8 was a milestone release. A big revamp to the product and lot of new generation marketing tools. (2014-2016)*

Rather than me writing about the Importance and the rich features that were provided by version 8, it’s market impact and etc, I thought I would share the Gartner Quadrant for DXP for all these years and end the discussion.

Gartner 2014

Gartner 2015

Gartner 2016

Gartner 2017

Sitecore have always been the Market Leaders in the top 2 spot.

Sitecore at this period 2013-2014 started expanding it’s product portfolio by acquiring commerceserver.net and released Sitecore Commerce Server by 2014. (Acquisition)

Sitecore Today (Sitecore 9 & 10) (Cloud – Headless – Containers)

Sitecore 9 again had lots of change in the product architecture, several new components were introduced. Sitecore Identity server, Sitecore Xconnect. Prior to Sitecore 9 Web Forms for Marketers was the module that was used by content authors for creating a form on their sitecore website on the fly. In Sitecore 9 for this requirement – Sitecore OOTB Form module – Sitecore Forms were introduced. Again the experience data xDB was moved back to SQL from MongoDB.

The other key change that was introduced during this period was Sitecore started to provide support for PaaS. To date almost all the Sitecore versions running in 9/10 are PaaS hosted. (With Sitecore 10 Docker support, the trend is shifting towards Docker but migrating to docker requires a steep learning curve. Will discuss about Sitecore 10 features later.)It was at this time Sitecore also started to release matured SXA module.

Sitecore showed early indication of moving away from tightly couples architecture to lightweight headless offering from this release by introducing Sitecore JavaScript Services (Sitecore Headless now). That allows us to create sitecore web applications in disconnected mode using JavaScript libraries and frameworks like React/Angular etc.

Sitecore 9 – (2017-2020)

Gartner 2018

Gartner 2019

Gartner 2020

Sitecore 10 tipped the sitecore scale towards containerization. Sitecore started providing direct support for Docker/Kubernetes and directed clients/tech folks to adopt to the containerization world. Apart from this Sitecore also provided sdks/headless offerings based on .NET Core Rendering. They also introduced a new product – Sitecore Managed Service for content serialization purpose.

Gartner 2021

Gartner 2022

Sitecore moved to headless, provided containerization support, extended it’s marketing capabilities. Provided all marketing and analytics data of your website in one place. It is still in the market leader quadrant but kinda moved back, when  compared with Adobe, Optimizely or Acquia.

So what might be the reason? When checked at the Gartner release caution note,(Not the sole reason but something to work on)

So, shift to SaaS and behind the market pace in acquiring products may be? Okay valid concerns. Let’s see how sitecore plans on addressing these.(Although they would have identified this earlier and must have already come up with a plan)

Sitecore Tomorrow (Cloud First – SaaS – Composable)

~Sighs~ Here we go.

So over the last 14-16 months, we would have heard or read about Sitecore going on a acquisition spree. Four41, MooSend, BoxEver, Reflektion. All these a SaaS replacement for some of the Sitecore Marketing Application modules or other existing products or add on to existing products.

Sitecore acquiring companies is not new. In fact it Sitecore acquired Pectora(2011), CommerceServer.net (2014) -Sitecore Commerce and StyleLabs(2018) – Content Hub.

So why the buzz now?

I feel sitecore is making a big change in their approach. When I mentioned in the earlier part of this article, where Sitecore wanted to provide an all in one place solution, Now Sitecore is looking to provide them as a separate SaaS module. For ex. MooSend which is Sitecore Send – for EXM requirements.

Sitecore in it’s core product – XM/XP has always been monolithic. It’s now planning to move towards light weight, headless and composable . (XM Cloud)

Please note that these products has some features that are not present in their Sitecore counter parts and at the same time there are few features that are similar to what their Sitecore counterparts have. So after some integration and changes the next stable version might have some good changes.

Four41 – Sitecore Order Cloud – API First – Headless – Cloud Commerce Platform

BoxEver – Sitecore Customer Data Platform – Segmentation & Insights

MooSend – Sitecore Send – E-Mail Marketing and Automation

Reflektion – Sitecore Discover – AI-Powered Intent Identification and Product Search

So to build all these products in house with their existing headcount and compete with other leaders with a faster time to market?? Hence this spree/Buzz.

SUGCON 2022 Europe – Budapest – Hungary

After, SUGCON 2020 EUR getting cancelled in the same city,  after 2 years, the event was organized and conducted last month. A lot of new infos and details about their new product launches – XM Cloud/Content Hub headless and Sitecore Road Map 2022 was presented and talked about. Sharing them from twitter here so that it connects with whatever I’ve mentioned in the article so far.

Sitecore is expanding, increasing headcount, increased it’s spending on R&D. Adopted to better strategies. Poised to retain their position as Market Leaders.

With all these changes, plans and road maps, I believe Sitecore’s graph will move further up in the coming years.

* Years mentioned may have 6-12 months difference.

Sitecore – What is that {webroot}/App_Data/items/****.dat ??

So, last week I read an article about Sitecore Upgradation by Martin Miles. In that article, at Upgrade Database step, it was mentioned that the default items in sitecore from 10.1 and above, are not stored in database and are read from file system.

10.1 was released almost a year ago and although I am working on a 10.1 instance I missed this information somehow. But it got me curious and I immediately checked the web root folder to see the file. The physical files are present under,

{webroot}/App_Data/items/core/items.core.dat

{webroot}/App_Data/items/master/items.master.dat

{webroot}/App_Data/items/web/items.web.dat

Prior to 10.1 there were no such folder called items under App_Data (Sitecore 10-App_Data folder below)

So, yes…..we have located the file. Now let’s open it and see the system defaults and get this over with and start my weekend!

But my stars had other plans it seems, When opened that dat file in notepad was surprised to see the defaults as below,

I missed the idea that it would have been encoded somehow. But I was not convinced yet, so to confirm that default items are not present in sql master db, I checked the database table itself.

Comparing it with a DB from 9.3

The few records which you see in 10.2 master database must be from my custom changes. Yes, the default items are not present in the database. But I’m still not convinced. I want to see the data inside items.master.dat file. So I explored deeper.

After some browsing, I was redirected to the Sitecore.config file.

Sitecore 10.2 Sitecore.config and……Voila!

The dataproviders and protobufitems are specified here.

When checked in Sitecore 10 sitecore.config no such values were specified.

Now there is this new terminology – Protobuf (well..at least for me it was). So as I said earlier, the sitecore default items are stored as dat physical file right, Protobuf is a google based serializer. So the default items are serialized using Protobuf and are shipped as file system.

So now, if we deserialize the dat file, we’ll be able to see the actual data. I started looking for various online protobuf serializers and to my luck, I didn’t find any. At the same time I was still curious and somehow wanted to see the data in the items.master.dat file.

So, I decided to see some .net code snippets for deserializing using protobuf package. So I came across this article, which made it pretty much straight forward. Read the file system, Serializer.Deserialize that’s it.

Created a simple .NET Console Application, Added the required nuget package,

When I actually wrote the code, the type <T>????

Then I remembered, that I had installed JustDecompile long back and based on the values specified in the sitecore.config – Database section – Sitecore.Data.DataProviders.CompositeDataProvider, Sitecore.Kernel; Sitecore.Data.DataProviders.ReadOnly.Protobuf.ProtobufDataProvider, Sitecore.Kernel; decided to decompile the kernel dll and see how they’ve handled it.

While loading these dlls, it asked for the dependency dll – Sitecore.Data.ResourceItems.ProtobufNet

After going through these dlls, realized that, the data is serialized as ItemsData using Protobuf. So to deserialize it, added this dlls reference to my application and …..

Now I’m convinced. 🙂

So, the reason for this change is that, it creates a separation between default items and our custom content changes thereby enabling upgradation process easier. Meaning, when we upgrade the sitecore instance, just these files have to be updated.

Sitecore Debugger

In one of my previous assignment, I was told, the load time of almost all the pages in the website is higher and was asked to analyze and improve the page load time.

That’s when I remember one of the Sitecore’s OOTB gem -> Sitecore Debugger. Sitecore debugger is available from very early versions – Sitecore 5, I guess (subject to correction). But to date, still there are several developers who are unaware of it’s feature hence this post.

Sitecore debugger when activated, loads the pages in debug mode. This debug mode, loads the page along with information about the load time of the page. By this I mean, it provides us information about the load time of each and every rendering in the page and more. As you know, sitecore renders the page via a pipeline of processors like item resolvers/layout resolvers etc, sitecore debugger provides the time taken by these actions as well.

Now coming back to the case study, When I opened one of the page in debug mode, I was shocked to see that the Header Navigation and Footer Navigation was taking almost 3/4th of the page load time. I was relieved as well. As now it makes sense why the load time of all the pages were high. And if I get to fix the load time of these two renderings then that it would solve the all the pages load time issue.

It was a multi lingual/multi site where the main navigation was rendered by reading all the contents under the content tree where a ‘include in header’ checkbox was enabled. The number items read to display header menu was more whereas the menu items displayed was less than 20. This information was provided in the Sitecore Profile session of the sitecore debugger. Finally, I fixed the performance issue by rewriting the logic. Instead of going through all the content in the content tree, based on the site definition, identified the site root path and processed only the content items under the site root path.

Sitecore debugger can be opened in two ways. One via Desktop Start Button in desktop (this opens the default site in debug mode from homepage)and second via Experience Editor->Debug Mode this opens the current item selected in the content tree.

Now going back to Sitecore Debugger, it provides two main stack of data about the page. Sitecore Profile and a more detailed report – Sitecore Trace. Sitecore Profile provides information about most time taken components – rendering under Hot Spots banner. It also provides high level  information about the page. It gives info about Number of items read, Cache hits/misses etc

Sitecore Trace gives a more detailed stack information about the page load events and time taken for each steps. The total time taken along the time taken by individual events.

The profile/trace can be saved to a location in the Webroot or can be downloaded. It gives an XML version of the reported data.

Sitecore for Visual Studio

I have already explored Unicorn and Sitecore Management Services for Sitecore Content Serialization purpose and written couple of articles about them. This is in continuation to that series.

(a small recap, to set the article context)

Prev. developers used TDS/Unicorn for content synchronization. TDS comes with license cost whereas Unicorn is open source. Although these two tools does the same functionality – Content Sync, the way in which they do that greatly differs. As TDS is a licensed tool, it comes with better UI and few additional features compared to Unicorn.

But these are all in the past. With Sitecore 10, sitecore introduced a new alternative to TDS/Unicorn which is Sitecore Content Serialization – a system for serializing, sharing, and deploying content items, as well as keeping them in version control.

SCS comes with two interface – Sitecore CLI(a PowerShell based approach) and Sitecore for Visual Studio(a TDS module).

We have seen about Sitecore CLI in prev. post. In this article, we’ll explore more about Sitecore for Visual Studio.

Sitecore for Visual Studio comes up with a per license cost of 399$. But thanks to their trail program, I was able to get a trial version for 30 days which I used for exploring SVS. The link for free TDS Trial. You can only use your official mail id – your organization’s mail ID to get the license key. The license key will be sent to your mail id.

You can download the SVS plugin from this link. The latest version, Sitecore for Visual Studio 4.1.0.0 requires, Visual Studio Community 2019 17 and above. Unfortunately, my local version is not updated to that version yet so I am using SVS 1.0.0.9 for this demo.

Once downloaded, unzip->install the SVS VS Plugin.

After installation, when you open your VS Solution, you’ll be presented with the License Agreement, accept them. Post that you’ll be redirected to the License Manager Dialog. Enter you license details and proceed.

After entering the license details, you can open the Sitecore Module Explorer from View->Other Windows->Sitecore Module Explorer.

I have two module.json file in my solution, SVS automatically detects the module.json files and shows them here. (You can add module,included and rules right clicking Modules->New Module. Enter the module details like namespace etc. Right Click on the module to add includes.)

You can pull the changes from Sitecore to Disk by right clicking on the module.

We can check-in the changes and in the target environment we can do the ser push which will move the synced  yml changes to sitecore content tree.

Watch

With watch enabled, whenever we make a change to an item in the content tree, sitecore automatically serializes that item to disk.

For eg. The existing value of a field in my home item is,

After changing,

Without doing any pull as watch is enabled,

To conclude, Sitecore CLI and Sitecore for Visual Studio are not entirely two different tools. They are just two different ways of doing the same process. Both same components in the background. Advantage is SVS gives a friendly UI. We can add or remove modules, set module scope/add rules easily. But this comes with a 399$ license cost.(Including TDS).

Sitecore Patents

Sitecore Personalization:

So, you must have probably used Sitecore Personalization using rules. You must have added some rules to your rendering to provide more personalized content to your visitor based on some conditions. When these conditions are met, the rules are triggered by the rule engine and the content is updated.

Sitecore Optimization – A/B Testing:

You must have setup Sitecore A/B testing or Multi Variate testing on your web page to get better insights on which content to be used so that it drives more value to your site. This helps content authors in creating the best content for your web page that has the best possibility of driving more values to your site on each user visit.

Sitecore Path Analyzer:

You must have used Sitecore Path Analyzer to know about the most efficient and least efficient paths that a visitor takes while accessing your site. You must have used to identify the path taken by the user from landing page to any of your product page. Once you the insights you can position the page in nth level of navigation accordingly.

Profile/Pattern Cards:

You must have created Profile Keys, Pattern Cards and Profile Cards to profile your visitor based on their online behavior and then assign them a profile/pattern and identify the best pattern match. You finally use this to get better customer insights and finally provide better customer experience.

All these are some of the Sitecore’s Marketing Application modules and some of use may have used them regularly. I always wondered how did they come up with the idea of these applications. We have seen the final product, I wanted to get some insights – tiny behind the screen peep. To understand them from raw requirement perspective. And did came across some interesting articles. Got the patent details pertaining to these modules owned by Sitecore. Sharing these info here hoping you find it interesting as me.

US Patent for Webpage comprising a rules engine Patent (Patent # 9,679,073 issued June 13, 2017)https://patents.justia.com/patent/9679073 – Base for Sitecore Personalization using Rules.

US Patent for Method and a system for analysing impact of changes to content of a website Patent (Patent # 9,292,615 issued March 22, 2016)  – https://patents.justia.com/patent/9292615  – Base for A/B Testing and et all

US Patent for Method and a system for analysing traffic on a website by means of path analysis Patent (Patent # 9,524,511 issued December 20, 2016)  – https://patents.justia.com/patent/9524511 – Base for Sitecore Path Analyzer.

US Patent for Method and a system for managing a website using profile key patterns Patent (Patent # 9,003,015 issued April 7, 2015)https://patents.justia.com/patent/9003015 – Base for Sitecore Profile Keys, Profile/Pattern Cards.

Other patents owned by Sitecore are available in the mentioned portal. Portal also shares information about other patents owned by Salesforce, Apple, Tesla etc

Some key portals a Sitecore developer should be aware of

So, IF you have been assigned to a Sitecore Project for the first time  or you’re just getting started with Sitecore or  you don’t know what are options available as Sitecore reference, this article is written to aid you.

Sitecore Downloads

https://dev.sitecore.net/ is the official site for downloading all sitecore products (Experience Platform, Experience Commerce, SXA, Headless, Sitecore Management Services and more). It  contains some key information like Release notes, Installation guide, Upgrade guide, Usage Policies and more. It’s the first place one should look to download any official sitecore modules. Previously, downloading sitecore products from this site was limited only to sitecore certified developers. But, now that restriction is revoked and anyone can access this site and download the sitecore products. However, you should have a valid sitecore license to setup sitecore in your machine.

Sitecore Official Documentation:

https://doc.sitecore.com/ – Sitecore Doc site contains all the official documentation related to any sitecore product. It’s contains information from basic level to technically more deeper and challenging concepts. It contains articles for both technical and non technical sitecore users. Contains step by step articles for customizing some of the basic functionalities of sitecore. This portal contains A-Z official documentation about any/all sitecore product.

Sitecore Profile

https://profile.sitecore.net/ – You can create your sitecore profile with this site. Sitecore uses Okta for Identity management. Once you setup your account in this portal you will be able to access resources from all other sitecore portals like community/elearning/marketplace(will discuss about them below). You can use your official mail id to create a sitecore profile to avail partner benefits.

Sitecore Learning Portal

https://learning.sitecore.com/ – This is Sitecore’s Official Learning Portal. It is only from this portal one will be able to register for any Sitecore Product Certification as well. Once you create a sitecore profile using your organization mail id and your organization is a Sitecore Partner, you will be eligible for additional benefits like free learning modules, additional discount for Sitecore Certification exams based on the Partner tier.

Recently, sitecore has released some free for all learning modules that would be a great place to start if you are planning on getting into Sitecore world.

One of my favorite aspects of this portal is it will provide a recommended learning path of various Sitecore modules/products based on your aspired/current role.

Sitecore Partner Finder:

https://www.sitecore.com/knowledge-center/partner-finder – We have seen more of technical and professional portals so far. This one is just a small application in general sitecore.com portal. But this gives information about various sitecore partners across the globe and their tier classification, product specializations  and more. I refer this portal more often than not to know about various sitecore partner, their service offerings and region of service. :p

Of course this doesn’t provide any info about Sitecore and it’s products. But I use this portal to assess where I am and where the industry leaders are.

Now, let’s go back to professional/technical portals.

Sitecore Developer Portal:

https://developers.sitecore.com/ – Sitecore Developer portal is more like a map for all your sitecore developer needs. It contains details about all the sitecore products(related references and links to doc.sitecore.com articles) organized product wise. This portal also provides the list of events and updates related to Sitecore Developer Community like Hackathons, Sitecore UserGroup Conference etc. Sitecore official GitHub account provides example/sample repositories to get started. Few of the sitecore sample solutions like Lighthouse, Helix Example, JSS are available in official Sitecore GitHub public repository.

Sitecore Marketplace:

https://marketplace.sitecore.net/ – Sitecore Marketplace is not much used now and one can’t currently upload any new module here. But still, this is like Android/Apple/Windows App Store. People from the Sitecore community develop modules and upload them here for public use. Some of the widely used Sitecore PowerShell Module, Redirect Module, SIM were all made available here. 

Okay, we have covered almost all the portals except two. In fact three. These three are next level portals you can refer to get solution .

  • Sitecore Community

https://community.sitecore.com/ – Contains various forums, sitecore community event details etc. You can use sitecore community forums to ask queries regarding your sitecore issues.

  • Sitecore Slack Channel:

https://sitecorechat.slack.com/ – You can use  https://sitecore.chat/ to register for your slack access.

  • Sitecore Stack Exchange

https://sitecore.stackexchange.com/ is the official sitecore stack exchange portal. Recently it got moved from it’s beta version to full version.

If all these portals doesn’t help you, you can always reach out to the official sitecore support team for queries/ technical assistance or may be even product bugs.

Sitecore Support Portal:

https://support.sitecore.com/ – You can raise support cases – service ticket/check the status of your tickets related to your sitecore technical queries here. You have to login with the sitecore profile  (created with your organization mail id) to raise queries against your required client by mapping the relevant client license. Please refer the below official article on how to use the Sitecore Support Portal.

Support Information – How to use the Sitecore Support Portal

Apart from support cases, it also contains Knowledge Base(KB) articles. For instance, recently (2 months) ago Log4j vulnerability – a security issue was identified and the mitigation solution was made available via support portal.

If you are using Sitecore Manage Cloud or any of Sitecore Cloud services, you can see the status of those products here.

Publications – Status Portal (sitecore.com)

Sitecore – Azure AD Integration with Sitecore Identity Server

This article talks about steps to be followed for integrating Azure AD with Sitecore Identity Server(SI). It doesn’t involve any code changes, just some setup in Azure portal and a few config changes in SI Server.

We will be needed to update the Client ID, Tenant ID in Sitecore.Plugin.IdentityProvider.AzureAd.xml file present in your {IndentityServerRoot}/sitecore/Sitecore.Plugin.IdentityProvider.AzureAd/Config folder.

As I had to experiment this on my personal setup, I had to create a tenant on my personal subscription.

Before setting up your tenant, one has to add Microsoft.AzureActiveDirectory as a resource provider for your subscription. You can do that by,

  • Open Subscriptions in the Azure Portal
  • Select your required Subscription if you have more than one subscription available.
  • On the Left Side Menu, select Resource providers and on resource providers list, select Microsoft.AzureActiveDirectory and select register.

Now, to create a Azure AD B2C tenant,

  • On Azure Portal home page click on Create a resource and search for Azure Active Directory B2C and then select create.
  • Create a new Azure AD B2C Tenant.
  • This will ask for an Organization details and Subscription/Resource Group.
  • Once created, Azure will switch your directory to the new one you created.

Now we’ll register a new app in the Azure AD B2C of this directory.

  • Make sure you have enabled ID tokens.
  • In the Manifest, set groupmembershipclaims to “SecurityGroup”
  • After registering the app, you will be able to get the application id (Client ID) and Directory ID (tenant ID).

After filling these ids in the XML file, we can’t expect Sitecore Login via Azure AD to work for two reasons.

  • Your tenant will not any user except your default azure account. And to login via Azure AD, the email id generated based on your tenant sometime will be confusing. So, we’ll create a user to the tenant.
  • Even after successfully logging, sitecore wont know the role to be assigned to the user.

First, to create a user in your tenant,

  • Go to your tenant’s Azure Active Directory. Select Users option from the left menu. Click on New User and fill in the details.

In a real time the organizations will ideally use a separate process/tools to create users for experimenting purpose we are creating them manually.

The second to last step involves, creating a group in Azure AD. Say for eg, we’ll create a Sitecore Admin group in Azure AD and add the user to that group. When that user logs into sitecore via Azure AD, it will be automatically given Admin role based on our configuration.

This is useful, when you store/manage all the user details in one place. However there are certain points that needs to be noted.

Now coming back to the group creation,

  • Go to Azure AD app, in the left menu select Groups and click on New Group.
  • Give the Group a Name and description and add Owners, the user we created earlier and create the group.

You can include such group id in the claim transformation at Sitecore.Plugin.IdentityProvider.AzureAd.xml file. You can add a separate group for different role and map the group ID to Sitecore role.(Author role in this instance)

That’s it. Now we can try logging in via Azure AD

Design a site like this with WordPress.com
Get started