All time stats:

2023 (as of Nov 26 – 2023) Stats Summary:


All time stats:
2023 (as of Nov 26 – 2023) Stats Summary:

Was asked in Sitecore Slack recently whether we can customize Sitecore Webhook Payload. I didn’t know if we could or how to customize them. Wanted to find an answer to that…..Found a way, thus this article.
Please note that as I did this just for exploring and self learning or as a POC kind of activity, I couldn’t completely develop this as a enterprise level solution to a requirement. Please update the code as per your need/coding standards.
Let’s get started.
Sitecore Webhook Payloads are way more Sitecore Centric and are (as it is) at times not fit to be posted to external systems.
When I explored Sitecore Webhook initially when it was released felt that the default payload is more Sitecore Centric meaning, it has only the Item ID, Publish Target, RecoveryID etc ???? PFB a sample payload for an Publish End event. I am not sure if all these fields are useful or even required while posting a payload to different system.

In order to make full use of Webhooks, this payload data must be customizable.
Say we need some configuration item belonging to a particular template whenever created and published, some of it’s field values needs to be posted to an external system. Or after a Sitecore Task Scheduler is successful and you have to post an item’s field value to an external system. These are scenarios when Sitecore Webhook come handy. But with OOTB implementation we may not be able to post those item’s field data or any other computed data. In such cases, customizing the webhook payload will be handy.
Initially, tried going through the \App_Config\Sitecore\CMS.Core\Sitecore.Webhooks.config and checked WebhookSubscriber and InitializeWebhooks from Kernel DLL. But didn’t find any useful.


When went through the Webhook Event Item, saw that it didn’t have any field except Event Name.

Just took a shot, thought of creating a custom event and triggering the event with custom properties hoping that will be used as payload when the event is triggered.
Step 1: Created your custom event and it’s event handler.


P.S: Here, instead of creating a custom event, you can create a event that subscribes to existing sitecore system events. So that these events will always be called after those system events. Custom properties can be added to these new events which will be used by Sitecore Webhook for payload.
Step 2: Create a Custom Folder inside Webhooks/Event Types. (So that you have a separation between sitecore system events and custom events)

Step 3: Trigger this event with Custom Payload. I just created a Controller Rendering with an action that triggers the event with custom payload.

Created properties – a dictionary with string as key and object as value. Included the custom payload.
(Webhooks weren’t triggering when you don’t use properties meaning payload which is not of Dictionary<string, object>. I got error initially and spent a lot of time troubleshooting when I used Event.RaiseEvent(events, new object[]{ “key”, “value” });)
Step 4: Create a Sitecore Webhook Handler that subscribes to our custom event.

Included this to a page for testing and loaded the page……Voila!

While exploring about Customizing Sitecore Webhook payload, I came across this article by Kristoffer Brinch Kjeldby and found it helpful. Please refer them if you want to customize the payload for any existing events.

This is a second part in the series of articles exploring Sitecore Connect.
Setting the article Context:
Prev. we made use of available apps/actions listed in Sitecore Connect to create a recipe. In this article, we will see how we can create a recipe using a Custom HTTP Endpoint.
To make it interesting, we will create a FoodBot. As MVP 1 release, we will create a feature where user can interact with a MS Teams Bot -> Workbot and get preparation steps for a recipe of their choice. This time recipe here means food.
What we are gonna do?
And btw all this with no code.
TASTY:
Tasty is a free open source API. It can be accessed via Rapid API. It has several endpoints. One key end point is /recipes/list. It provides a data required to make a recipe.

Let’s get started.


Thoughts on Connect and Development Trends:

Have read about Sitecore Connect early this year and got a sneak peak into it when a session on Sitecore Connect was presented by Ivan. Initially wasn’t much interested on it may be it’s because it was promoted more as a Low Code or No Code platform. Developers kind a hate that right? We don’t want to do just some configurations. (Configurations…Recipes whatever???)
Keeping aside my “developer” ego, recently when got an opportunity to explore Sitecore Connect, jumped right into it. Spent 12 hours of the last 36 hours on it. Tried to summarize what I learned in this article.
Why Sitecore Connect?
We are now in Composable trend. Where you can have separate product for each of your CX needs. You need a Headless CMS? You can have Sitecore XM/XP, XM Cloud, Contentful etc. You need a product for Marketing Automation that isn’t tightly coupled with your CMS? You can have Sitecore Send, HubSpot Marketing Automation . You need a separate search product for your websites that is again not tightly coupled with your CMS, you can have Algolia, Amazon CloudSearch or Sitecore Search. Similarly for….well you get the idea.
In a world, were we have multiple products handling different requirements in the same Digital Experience landscape, wouldn’t it be easier if we have a product that facilitates seamless connectivity among these modules. So that these modules can work in sync.
First, within Sitecore portfolio, a Connector that allows data transfer between Sitecore Products. Second, a connector that integrates a Sitecore Product with other applications. Other applications include a CRM (Salesforce Marketing Cloud/Microsoft Dynamics 365 etc) or a Marketing Automation System or a Email/Messaging System etc.
What’s Sitecore Connect?
Well Sitecore Connect is one of the integration workbench announced by Sitecore in last symposium and officially launched on January 16 this year.
It was developed in partnership with Workato. Workato is a Automation platform for integration and workflow automation.
It’s a cloud based low/no code, drag-and-drop tool, aims to “solve some of the integration ‘tax’ of the composable DXP”.
Sitecore offers this as an app in their cloud portal – https://portal.sitecorecloud.io/

It’s a part of Sitecore Engagement Cloud,

Enough with the chit chat, let’s get into the components/features of the product.
Some Sitecore Connect Components/Terminologies
You can create a project for your requirement and each project consist of Recipes and Connections.

Recipes – Are like pipelines – DevOps pipelines or Marketing Automation Pipelines. Each recipes when turned on, will be configured to be triggered by a trigger event followed by set of actions/decisions and call functions.
Actions involve calling action in an app. There are several apps listed in connect.
Connections – Connection include setting up authentication with different apps.

Remember what I mentioned earlier – “First, within Sitecore portfolio, a Connector that allows data transfer between Sitecore Products. Second, a connector that integrates a Sitecore Product with other applications.”


Actions vary depending upon the app.
Now to integrating Sitecore XM/XP via WebHooks with Microsoft Teams using Sitecore Connect,


Now that everything is setup, start the recipe. Publish the item in Sitecore.


This may not be the best use case but it does serve the purpose. Ability to connect different systems seamlessly with low-code or NO CODE in this case. Moreover, we can create custom Webhook Handler in Sitecore for different requirements. When you do something in sitecore post a payload that can be configured as trigger in Sitecore Connect and then it can be used to plan any action in the available apps.

Recently, while trying to add an experience in Personalize for my application it wasn’t working.
Created a simple experience with OOTB component,

Included the right filter and page targeting

But still the experience wasn’t appearing the site. Initially thought this must be because of some organizational firewall. When I checked the experience experiment data, I could see a success status

“webPersonalization: “<boolean_or_object>”” key in the script.


Setting the context:
Recently, got an opportunity to explore Sitecore’s ‘CDP & Personalize’ – “Engagement Cloud” SaaS products. (Yea.. Content Cloud..Commerce Cloud…Enagement Cloud what’s this recent OBSESSION with word “CLOUD”?)
Very beginning when Sitecore bought Boxever, I checked it out (Around March 2021). Now that all the fuzz is down and lot of upgrades have been made to the product, thought I will get myself updated.
This post is more of a “Getting Started with CDP”.
So…What’s Sitecore CDP?
According to Sitecore.com,
“A Customer Data Platform is packaged software that creates a persistent, unified customer database that is accessible to other systems“.
In the XP world, we used to have the xConnect/xDb components right? Where we have modules to get the behavioral data of a user/visitor – The Experience Profile/Experience Analytics/Lists/Segments/Reports part. They are not accessible to other systems OOTB. Of course there is XConnect API but most of the time you have write something on top of it to share the data with other systems. This is a bigger and way…way latest version of that. Consider it from a Global Enterprise perspective, where you have customers across globe, different apps for different channels for customers. (Online/Offline) and you have to collect, merge, process, segment and provide options to expose these data to other systems. Sitecore XP Marketing Applications modules isn’t robust enough to handle such scenarios.
Composability and Cloud first:
The Experience Profile/Analytics part can only capture/process/manipulate/be used for only the sites defined in your sitecore instance, Sitecore CDP can be integrated with any site directly. This means that you can run your marketing websites on any platform but still can use Sitecore CDP. Also, as the Experience Profile/Analytics and other such modules are a part of Sitecore XP, it needs XP to be installed and managed by us. Where as Sitecore CDP is “Cloud based” in doesn’t need to be installed/maintained. It can directly be consumed.
Alright I could hear you thinking, enough with the bla bla, SHOW ME THE MONEY!

*Source: Discover Sitecore
Data from customer touchpoints/Other Data warehouse can be ingested via Stream APIs/Batch APIs and can then later the data can be requested for manipulation via Interactive API. These customer data can then be exposed various inbuild models/external Amazon..Azure..or any other ML models for processing -> for segmenting, profiling, audience sync etc.
Zooming IN on the Integration Process,
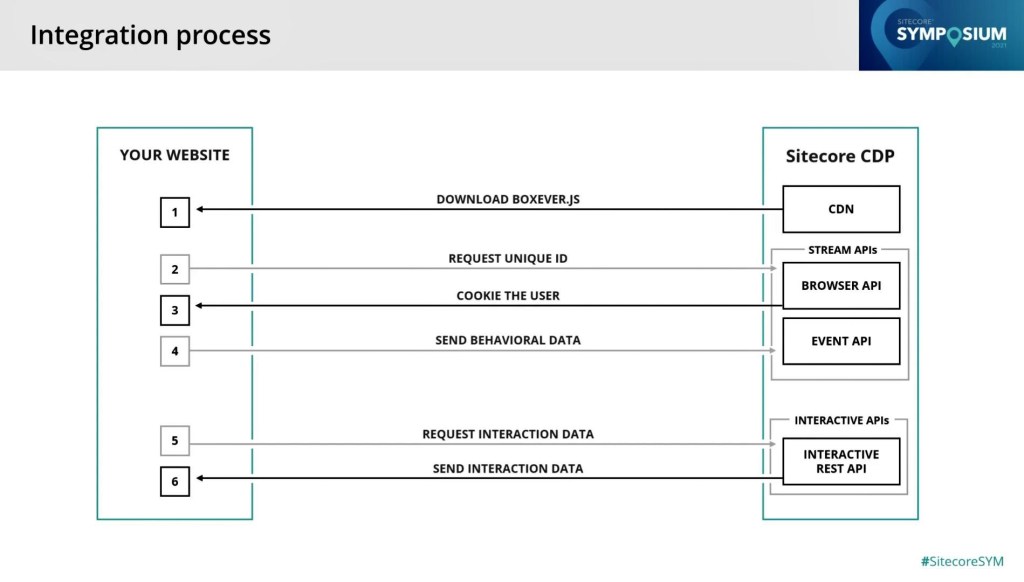
*Source: Discover Sitecore
Please read Boxever.js as Engage.js. Will explain this later.
There are several approaches for integrating CDP with an web application,
The suitable approach depends upon the nature of the application(.NET Core Web App/ React/Angular/Next based app). The entire documentation on this can be found in this page. For my learning purpose I used the simplest approach – integrating using a Tag Management System – Google Tag Manager.
Integrating CDP with you Application using GTM

<script>
    // Initialize the engage variable
    var engage = undefined;

    // Create and inject the <script> tag into the HTML
    var s = document.createElement("script");
    s.type = "text/javascript";
    s.async = true;
    s.src = "https://d1mj578wat5n4o.cloudfront.net/sitecore-engage-v.1.3.0.min.js";
    var x = document.querySelector("script");
    x.parentNode.insertBefore(s, x);

    // Initialize the Engage SDK
    s.addEventListener("load", function () {
      var settings = {
        clientKey: "<client_key_PLACEHOLDER>",
        targetURL: "<stream_api_target_endpoint_PLACEHOLDER>",
        pointOfSale: "<point_of_sale_PLACEHOLDER>",
        cookieDomain: "<cookie_domain_PLACEHOLDER>",
        cookieExpiryDays: 365,
        forceServerCookieMode: false,
        includeUTMParameters: true,
        webPersonalization: "<boolean_or_object>"
    };

    window.Engage.init(settings).then(function (result) {
      engage = result;

      // Send a VIEW event
      var event = {
        channel: "<channel_PLACEHOLDER>",
        language: "<language_PLACEHOLDER>",
        currency: "<currency_PLACEHOLDER>",
        page: "<page_PLACEHOLDER>"
      };
     engage.pageView(event);
    });
  });


Get the Google Container Code and inject it to your web application

I used my personal old sitecore instance that still runs on MVC. So adding it in the Main Layout.

And if everything goes well, now we will be able to see the data in CDP based on the user interaction to your app.


Cool!
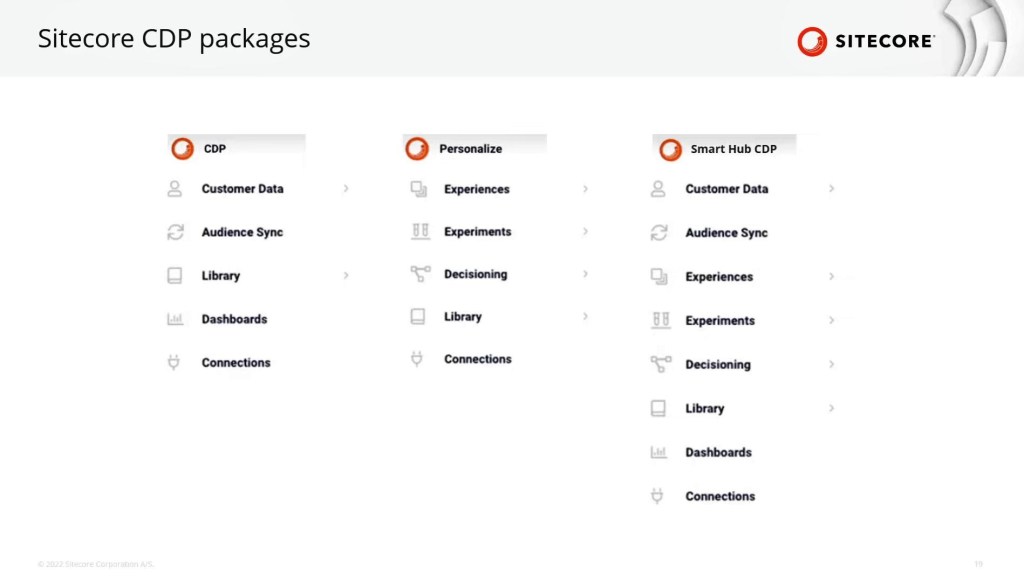
Behind The Screen:


That’s it with CDP for now, my next article is about an issue I faced while creating an experience. So to conclude this article I would like to share a small detail about the modules available in CDP and Personalize. Sitecore provides options for Sitecore CDP separately, Sitecore Personalize separately or Sitecore Smart Hub CDP. Felt that this would be good to know as what are the modules available in each package. Experience comes in as a part of Personalize.

Recently, I had to sort items repeatedly. Usually if I had to sort one or two items inside a folder, I would normally use Right Click->Sorting-> Sort ….

But this time I had to do this for than once and repeatedly. I am not sure if this sorting(based on my requirement) can be done with powershell or automated some other way. I didn’t explore that part.
I felt it would be helpful, if I could have some keyboard shortcuts. I was also not sure if sitecore has a default shortcut for sorting. (I didn’t check them either) I know only a 3-4 shortcuts. May be it’s because I was more interested to know if I can create a custom keyboard shortcut and if yes how?
So…turns out we can create our own shortcuts.
Keyboard Map:
Under Development Tools -> Keyboard Map

Press the key/key-combination in the keyboard. Sitecore generates a code.
For Eg: CTRL + UP – c38

Switch to Core DB,

Alternatively, you can add a new Key Map item under /sitecore/system/Settings/Key Map and map the key board code to the command.
This way you can map a keyboard shortcut to any custom command that’s created.


As it’s 2023 and we are working on XM Cloud as well, tried this in XM Cloud, it’s working in XMC as well.

Recently explored Sitecore Headless Application Development using NextJS and found few concepts interesting and worth blogging…hence this article. Although I intend to write about routing specifically but I may end up sharing more.
Since Sitecore is our primary focus, I plan to share the features of NextJS first and then where/how they fit in Sitecore Headless Application (based on NextJS) world.
What’s Next.JS…why Next.JS and what does it offer that React doesn’t? (Keeping it short – so just the highlights)
Planning to explore each of these in detail wrt Sitecore in coming days, starting with Routing. But before that,
In Sitecore world, this SSR/SSG has to be set while creating the headless application. For NextJS based Sitecore Headless Apps the default prerender is SSG. However this can be changed later or even better, some pages can be prerendered in SSG and remaining can be SSR. (Hybrid)
Pre-rendering: Generate the page's HTML is advance instead of them being generated in the client side.

Back to NextJS World -> Page Router


Alright I get what you are thinking about, this may work out for some standalone next.js apps, but in case of a headless CMS where hundreds and thousands of pages are created on the run… How would this work out? Obviously, we can’t create a route (physical page/file) for each sitecore page.
Well…to be precise, we don’t have to setup any file/route in case of sitecore headless app. As this will be handled by the /src/pages/[[…path]].tsx file that’s created when you create a sitecore nextjs headless app.
If you notice, this file also has the logic for not found page. Remember when we used to patch a pipeline processor for custom 404. This can be handled by updating the logic in this file.
NextJS World: This page uses a concept called catch all route a type of dynamic routing offered by NextJs. We can create a catch all route under a particular page by adding a file [[…anyfilename]].js/tsx/jsx


This will store all the segments of url the comes after /blog and can be processed as required.
Sitecore World:


Now, back to NextJS World,
All these we explored was before Next.js 13.4. From Next.js 13.4 instead of Page Router, App Router is recommended. I don’t see Sitecore leveraged App Router yet (I may be wrong, I tried to find some supporting docs but I couldn’t find any) and moreover a recent Sitecore Next Js App I created has code that uses page router.

App Router:
"Unlike the pages directory which uses client-side routing, the App Router uses server-centric routing to align with Server Components and data fetching on the server. With server-centric routing, the client does not have to download a route map and the same request for Server Components can be used to look up routes. This optimization is useful for all applications but has a larger impact on applications with many routes."
More about App Router -> https://nextjs.org/docs/app/building-your-application/routing#server-centric-routing-with-client-side-navigation

Recently, while setting up sitecore, using the official documentation, for syncing the content from XM Cloud to local, it required multiple commands. First need to login, then to connect to environment based on ID and then connecting local environment and then pulling and pushing.
Although when I did this first time, it helped me understand the cloud plugin and gained knowledge about the actual steps involved in the process, but on a large scale, when you wish to automate the entire local environment setup for your project or when there is a new developer who’s onboarded to the project or when you have to do the same process for the nth time, wouldn’t it be better if we can do this via a single script?
Also we cannot remember the environment id easily when compared with the environment name…So thought of writing a powershell script for this syncing process based on the project name and environment name.
As in XM Cloud, a single subscription can have multiple projects and each projects can have multiple environments, it possible to have environment with same name among different projects, thus the need for project name and environment name.
#SyncLocal.ps1 - Pulls the content from the specified project's environment to local
param ($projectName, $envName)
Write-Host "Logging in to XM Cloud"
dotnet sitecore cloud login
Write-Host "Getting Project Lists"
$var = dotnet sitecore cloud project list --json | ConvertFrom-Json
Write-Host "Total" $var.Count "Projects Found!"

foreach($project in $var)
{
    if($project.name -eq $projectName)
    {
        Write-Host "Identified " $projectName
        Write-Host "Checking Environment " $envName "in " $project.name
        foreach($environment in $project.environments)
        {
            $env = dotnet sitecore cloud environment info -id $environment  --json | ConvertFrom-Json
            if($env.name -eq $envName)
            {
                Write-Host "Identified " $env.name
                Write-Host "Attempting Connection"
                dotnet sitecore cloud environment connect -id $environment --allow-write true
                Write-Host "Connected"
            }
        }
    }
}
Write-Host "Connecting to Local Environment"
dotnet sitecore connect --ref xmcloud --cm https://xmcloudcm.localhost --allow-write true -n local
Write-Host "Pulling contents from " $projectName "-" $envName
dotnet sitecore ser pull -n $envName
Write-Host "Pushing contents to local"
dotnet sitecore ser push -n "local"
Of course, this script should be fine-tuned if you need some error handling. The main idea behind this post is to highlight the ways we can extend Sitecore cloud plugin via PowerShell for our custom requirement.
Make sure you update your local environment name as per your setup.

The article in a nutshell, for migrating contents to XMC, it can be packaged or Sitecore CLI XMCloud Plugin can be used for all our content related requirements i.e., serializing contents, port content from one XMC instance to another -> between developers and between environments. The new XM Cloud Plugin comes with cloud commands that help us achieve this.
When I first got to know about XMC I was really curious to know how the data/content gonna be structured? Will it be structured like Content Hub? The look and feel…the data…the schema and the way we create an entity….would it resemble Content Hub? Or would it be similar to what we have in XM/XP. Not sure if this is because I am more used to the items/templates/content tree type of thing, I have always felt this architecture as a bit clean and less complicated…no non sense way to handle content.
Because if there are slight difference in this area, then migrating contents from traditional Sitecore XM/XP would be difficult while migrating to XM Cloud. Difficult in the sense would require new tools and developers need to understand the new data architecture/process etc.
Although when I came to know that XMC comes with the same core/master/web/(horizon) db I should have connected the dots. But somehow I was blank until I actually saw XMC. May be because all the initial blogs/webinars I have seen showed/talked mostly about Sitecore cloud portal/XM Cloud Pages/XM Cloud Deploy and the new XMC Launchpad.
Alright coming to the point, XM Cloud also uses the same traditional Sitecore content editor.

All this preface about contents is to take a lead on how the content can be migrated from traditional XM/XP and about the new Sitecore.DevEx.Extensibility.XMCloud plugin.
Sitecore.DevEx.Extensibility.XMCloud Plugin:
Sitecore CLI from it’s initial release has released new plugins every now and then. (Serialization, Publishing, Indexing etc). One new addition to it is XMCloud plugin.
While setting up XMC locally, the up.ps1 itself installs the necessary plugins esp. XMCloud.


In fact this is how you will be redirected to XM Cloud Portal for authentication during the local setup process.
XM Cloud Remote Instance – Local – Cloud Plugin Operations:
dotnet sitecore cloud deployment create/start/info -deploymentID
dotnet sitecore cloud project list

dotnet sitecore cloud environment list --project-id 3yrb92gxtVo4GhtBllr5gh

Connect your local to the target environment:
dotnet sitecore cloud environment connect -id 1h1eqtyv0ZOVltfzYnBi3g --allow-write true
dotnet sitecore connect --ref xmcloudlocal --cm https://xmcloudcm.localhost --allow-write true -n "environmentname"


dotnet sitecore ser pull -n "Environment to be pulled from"

dotnet sitecore ser push -n "Environment the serialized files to the pushed to"

With the commands I mentioned above we can create a custom synclocalwithremoteenvironment.ps1 where we can pass the source and target environments and sync contents as an when needed, instead of running these commands every time.
And to conclude on the ContentHub vs traditional Sitecore XM/XP – a small comparison comment I made in the beginning, I would say XMC has the cool new features similar to the latest Sitecore SaaS products while retaining the robust, simple and clean traditional sitecore XM/XP components and modules.
